This will show you how easy it is to get CouchDb up and running on a Windows machine. I will show you how to use the builtin admin tool to secure the server as well as the database that we will create. I will then show you how easy it is to interact with it using a C# client called, MyCouch.
Install CouchDb (5min)
-
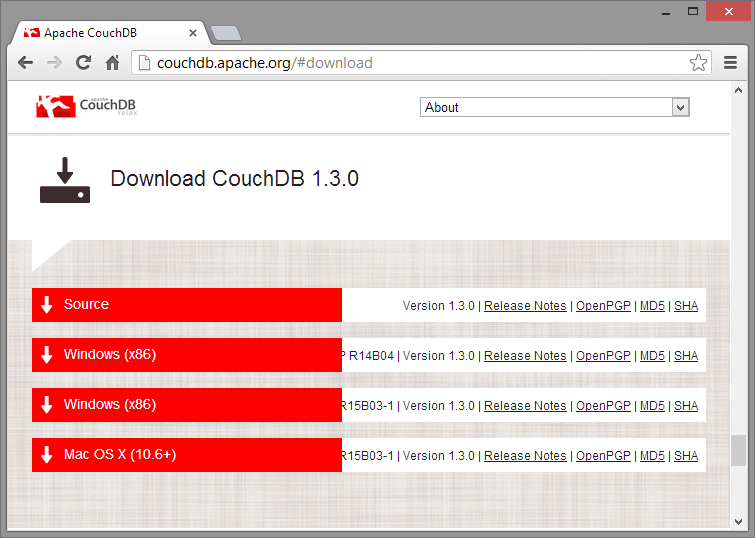
Select the Windows download, I selected:
Windows (x86) Erlang/OTP R15B03-1 | Version 1.3.0.
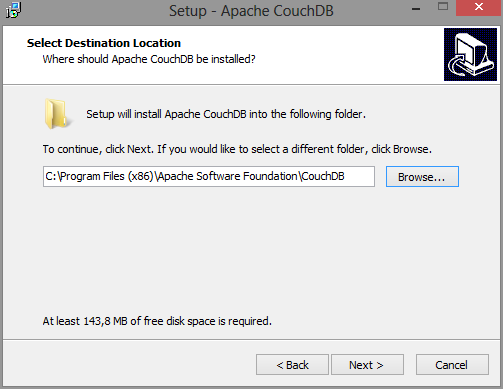
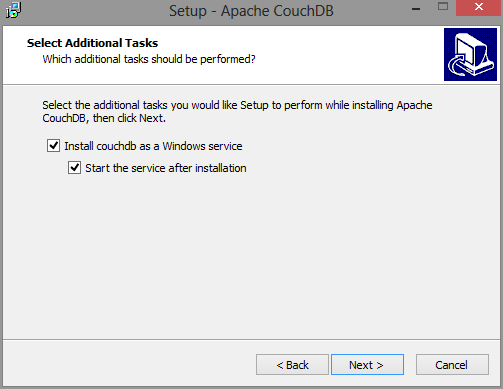
- After download is complete, run it. I went with the provided default options:
- Test it. Fire up a browser and head over to:
http://localhost:5984. You will be presented with something similar to this:
{
    "couchdb": "Welcome",
    "uuid": "c9e34dba2a5cc89e63cbd96be61c7529",
    "version": "1.3.0",
    "vendor": {
        "version": "1.3.0",
        "name": "The Apache Software Foundation"
    }
}
Well done, first task completed!
Use the admin tool to secure the server and our test database
This chapter shows you more than what is required just to test things out, so if you are not interested in the security parts, just ensure you have created the test database before continuing to the next chapter.
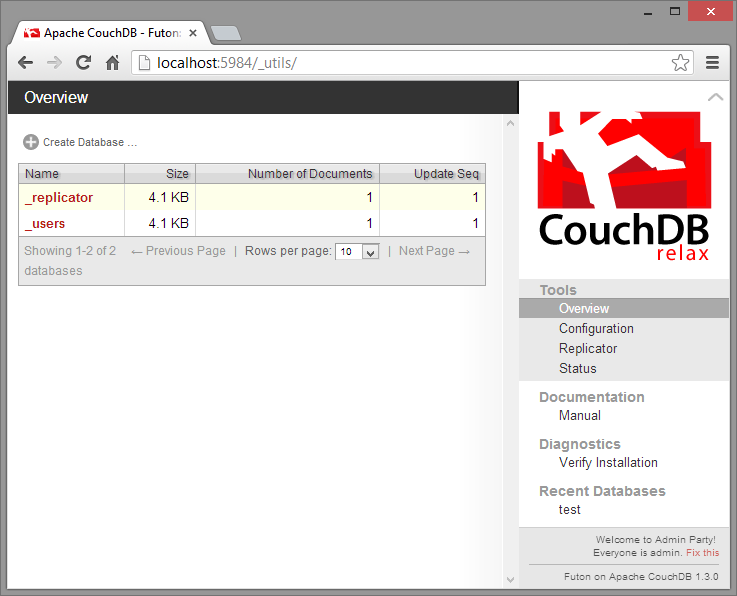
CouchDb comes with a web based admin tool called Futon. You find it by navigating to: http://localhost:5984/_utils/
Here you can manage your CouchDb installation like securing it, adding users, creating databases, designing views, managing documents in the database etc. What is important to note is the little text in the right corner:
Welcome to Admin Party!
Everyone is admin. Fix this
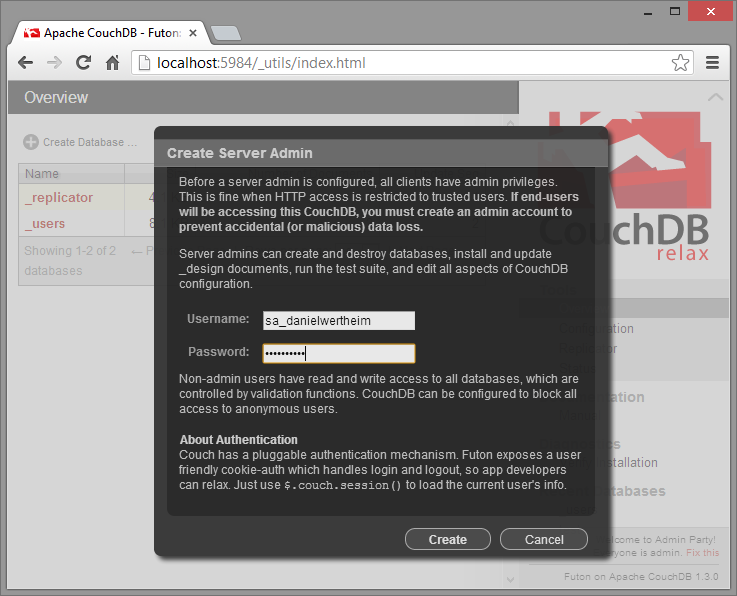
If you click the "Fix this" link, you will be presented with a dialog where you can create a server admin. Read up on this.
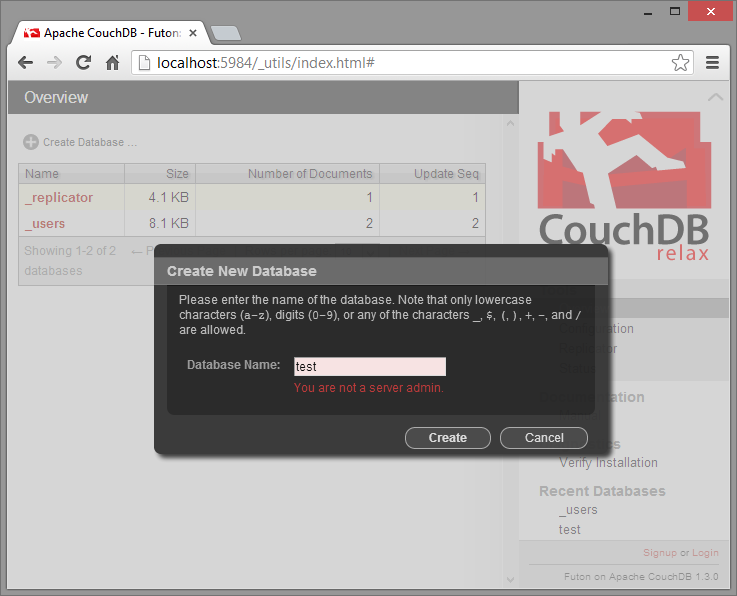
Now, log out and then try to create a database:
Nice! At least somewhat more secure. You should also note that CouchDb has support for activating SSL.
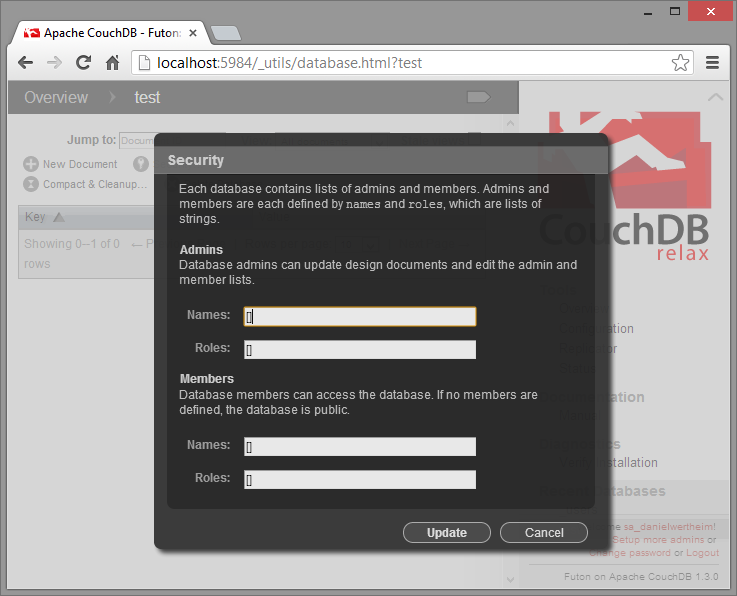
Login to Futon again and create a database called "test". And the press the Security icon. You should be presented with:
Here you can specify specific users or roles by providing either user names or roles for:
- database admins (NOT server admins).
- members
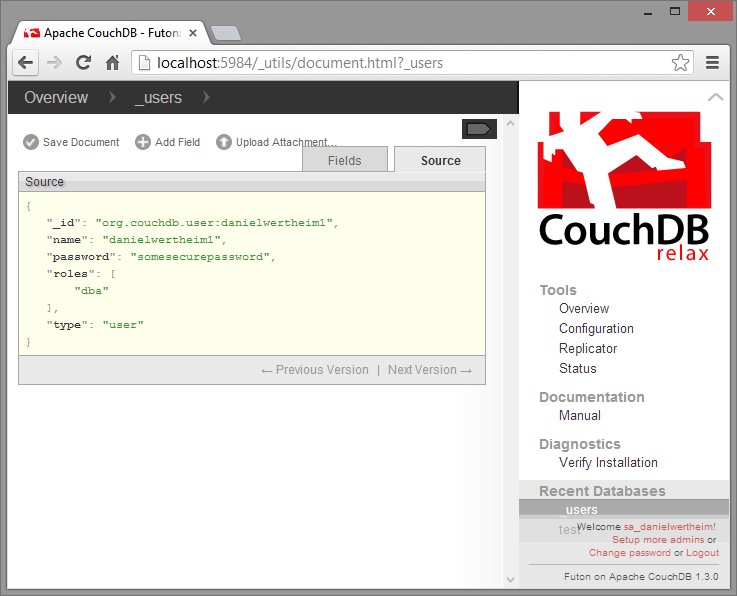
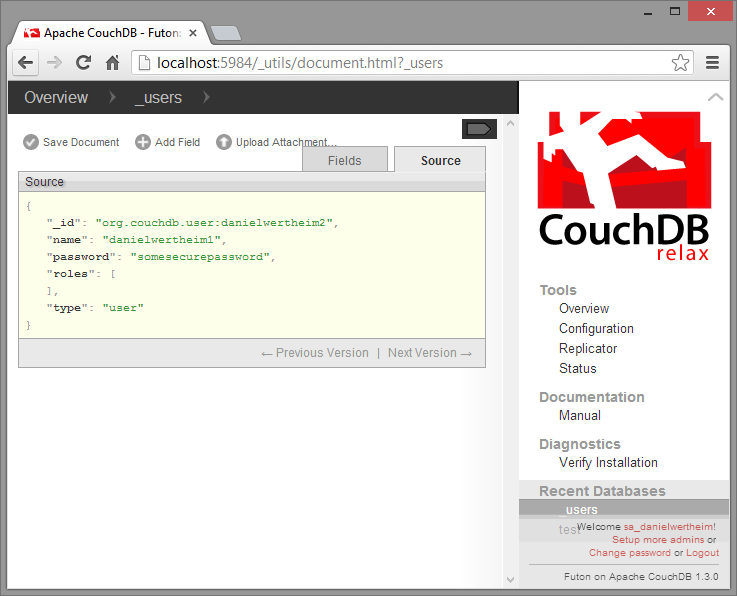
The user names and roles should match credentials for users stored in the _users database (open). In there the server admin user already exists. Lets create two new users. One that will be database admin for our test database and one that will be a simple member of it.
{
   "_id": "org.couchdb.user:danielwertheim1",
   "name": "danielwertheim1",
   "password": "testtest1",
   "roles": ["dba"],
   "type": "user"
}
{
   "_id": "org.couchdb.user:danielwertheim2",
   "name": "danielwertheim2",
   "password": "testtest2",
   "roles": [],
   "type": "user"
}
The passwords will NOT be stored in clear text, but will be encrypted upon saved. Also note that the first user was assigned a role dba while the second user wasn’t assigned any roles.
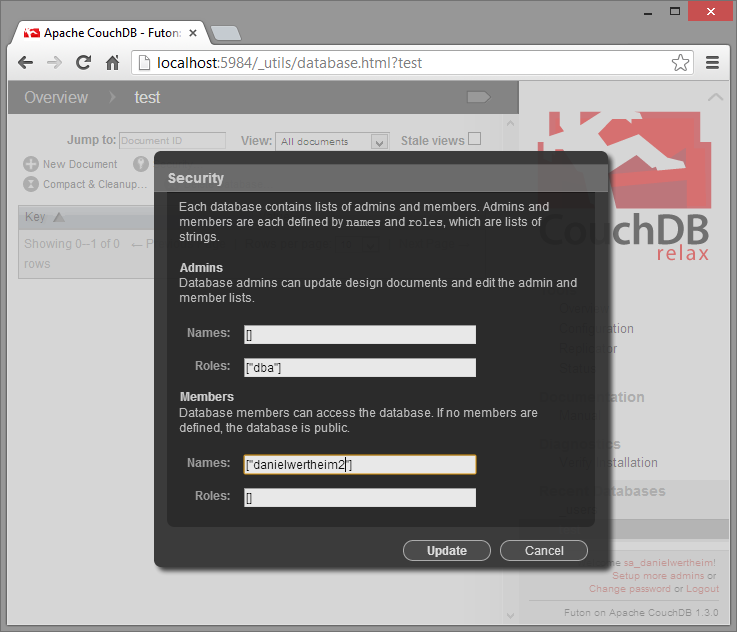
Now, head back to the test database and click the security icon and fill in the form:
Voila! It’s now secured. But again, you really should look into the link above regarding SSL, since CouchDb uses HTTP as transport protocol, hence credentials will be transmitted unsecured.
HTTP you say
Yes, CouchDb uses HTTP as its transport protocol and it is REST based, hence you could easily interact with it using any HTTP enabled client. My favorite tool for this is: Postman; which is a simple extension to Google Chrome.
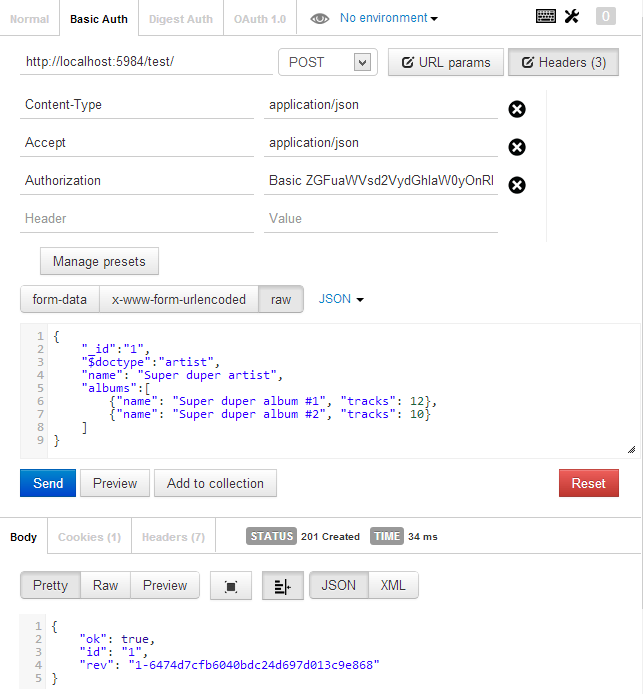
Let me show you have to insert a simple document representing an artist using Postman. The JSON for the document looks like this:
{
    "_id":"1",
    "$doctype":"artist",
    "name": "Super duper artist",
    "albums":[
        {"name": "Super duper album #1", "tracks": 12},
        {"name": "Super duper album #2", "tracks": 10}
    ]
}
_id is a CouchDb reserved field that holds the id of the document. I’ve also added a field $doctype which is not a CouchDb field, but something I use to indicate what kind of entity the document represents. This is useful when it comes to authoring views (as we will see later on). Some people include this info in the _id: "_id":"artist:1"; but that will increase the _id size which will have negative effects on sizes of your views etc., since they always outputs the _id.
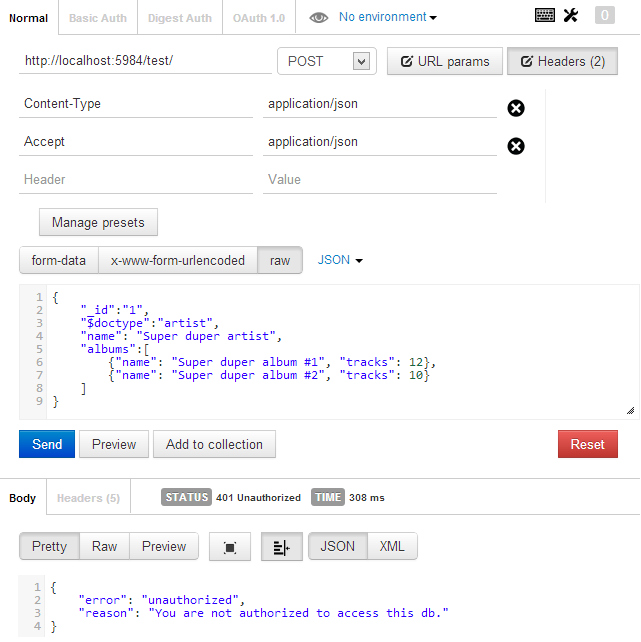
Time to try it out. Execute a POST against http://localhost:5984/test/ where test addresses the database we created before.
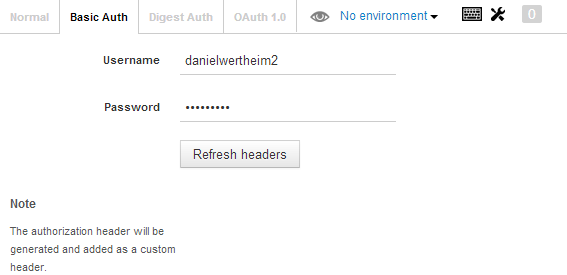
Notice the response. We secured the database hence we need to provide credentials for an user that is a member. I will use basic authentication for this.
Now if we retry the POST it shall succeed.
Pay attention to the response. It’s an 201 and it has the _id but also a new reserved CouchDb field, the _rev field. That field will be assigned a new unique value every time the document is changed. And that is how CouchDb handles concurrency checking etc. To update or delete a document, you need to provide the latest matching _rev. If not, CouchDb will not accept your update and will note you about it. Lets try it. Lets do a PUT to add a new album to the previously added artist. Execute a PUT against the following address:
http://localhost:5984/test/1?rev=1-6474d7cfb6040bdc24d697d013c9e868
And provide the following document:
{
    "_id":"1",
    "$doctype":"artist",
    "name": "Super duper artist",
    "albums":[
        {"name": "Super duper album #1", "tracks": 12},
        {"name": "Super duper album #2", "tracks": 10},
        {"name": "Super duper album #3", "tracks": 2}
    ]
}
Note that the address now points to the document with _id being 1 in the database having the name test. We also include the current _rev, and then a new document. Since CouchDb does not work with partial document updates, we have to provide the complete document. The response is an 201 with the following content:
{
    "ok": true,
    "id": "1",
    "rev": "2-8b8e0ed734dad8f7175bde5e6bff1161"
}
There are solutions you can implement to work around the fact that CouchDb updates the whole document. Read about "Update handlers".
If you try and execute the exact same request again, your request will not be accepted. This, since you are not using the latest known _rev. The response will be and 409 Conflict with the following content:
{
    "error": "conflict",
    "reason": "Document update conflict."
}
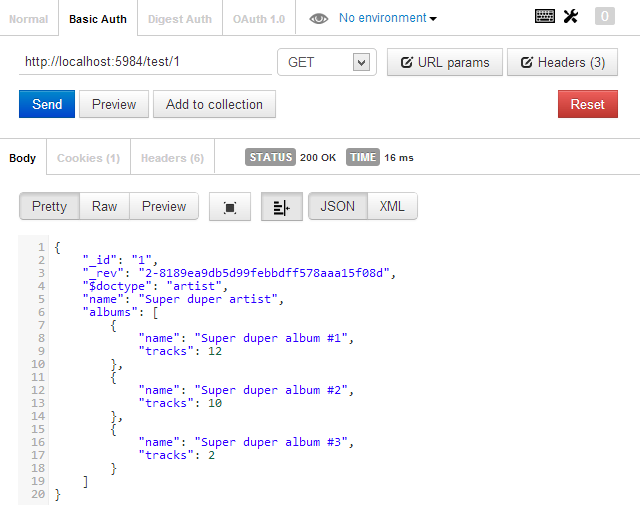
If you would like to get the document, just execute a GET using the following address: http://localhost:5984/test/1; and you will get the document in response.
Views
Lets take a crash course in CouchDb views. For more in depth material I recommend you to go through these resources:
- http://guide.couchdb.org/draft/views.html
- http://guide.couchdb.org/draft/design.html
- http://docs.couchdb.org/en/latest/ddocs.html
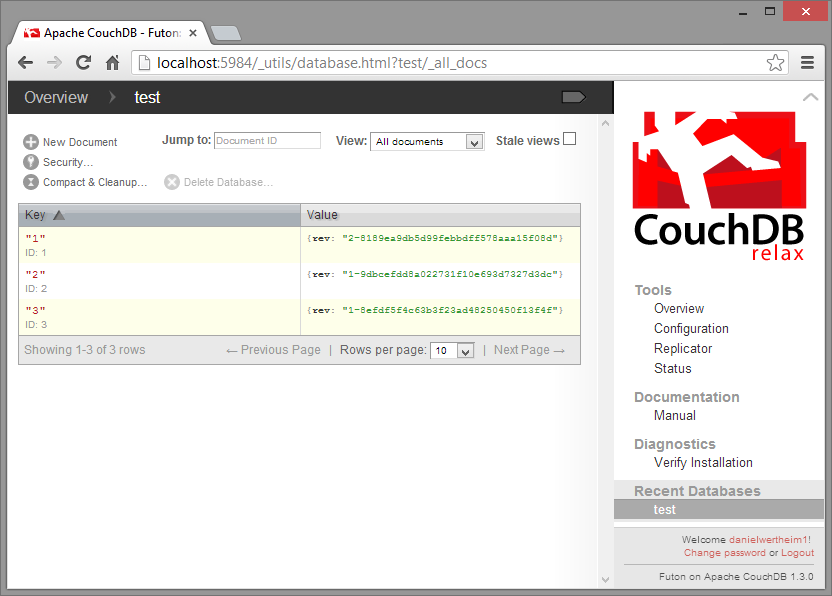
While you were fetching a coffee or reading some Twitter feeds our Facebooking, I took the liberty to add two more artists with some more albums so the database now contains a total of three artists. Now, lets look at them using a view. Before we create our own view, lets use a built in system view called all_docs. Execute a GET against the following address: http://localhost:5984/test/_all_docs. The response will be something like this:
{
    "total_rows": 3,
    "offset": 0,
    "rows": [
        {
            "id": "1",
            "key": "1",
            "value": {
                "rev": "2-8189ea9db5d99febbdff578aaa15f08d"
            }
        },
        {
            "id": "2",
            "key": "2",
            "value": {
                "rev": "1-9dbcefdd8a022731f10e693d7327d3dc"
            }
        },
        {
            "id": "3",
            "key": "3",
            "value": {
                "rev": "1-8efdf5f4c63b3f23ad48250450f13f4f"
            }
        }
    ]
}
There’s a special flag you can include to force the view to also load in the docs with the result. Do the same request and this time append include_docs=true in the query string.
{
    "total_rows": 3,
    "offset": 0,
    "rows": [
        {
            "id": "1",
            "key": "1",
            "value": {
                "rev": "2-8189ea9db5d99febbdff578aaa15f08d"
            },
            "doc": {
                "_id": "1",
                "_rev": "2-8189ea9db5d99febbdff578aaa15f08d",
                "$doctype": "artist",
                "name": "Super duper artist",
                "albums": [
                    {
                        "name": "Super duper album #1",
                        "tracks": 12
                    },
                    {
                        "name": "Super duper album #2",
                        "tracks": 10
                    },
                    {
                        "name": "Super duper album #3",
                        "tracks": 2
                    }
                ]
            }
        },
        {
            "id": "2",
            "key": "2",
            "value": {
                "rev": "1-9dbcefdd8a022731f10e693d7327d3dc"
            },
            "doc": {
                "_id": "2",
                "_rev": "1-9dbcefdd8a022731f10e693d7327d3dc",
                "$doctype": "artist",
                "name": "Super bad artist",
                "albums": [
                    {
                        "name": "Super bad album #1",
                        "tracks": 77
                    }
                ]
            }
        },
        {
            "id": "3",
            "key": "3",
            "value": {
                "rev": "1-8efdf5f4c63b3f23ad48250450f13f4f"
            },
            "doc": {
                "_id": "3",
                "_rev": "1-8efdf5f4c63b3f23ad48250450f13f4f",
                "$doctype": "artist",
                "name": "Awesome artist",
                "albums": [
                    {
                        "name": "Awesome album #1",
                        "tracks": 3
                    },
                    {
                        "name": "Awesome album #2",
                        "tracks": 10
                    }
                ]
            }
        }
    ]
}
You can also access this view via Futon. Just open the following URL in your browser: http://localhost:5984/_utils/database.html?test/_all_docs
Create a custom view
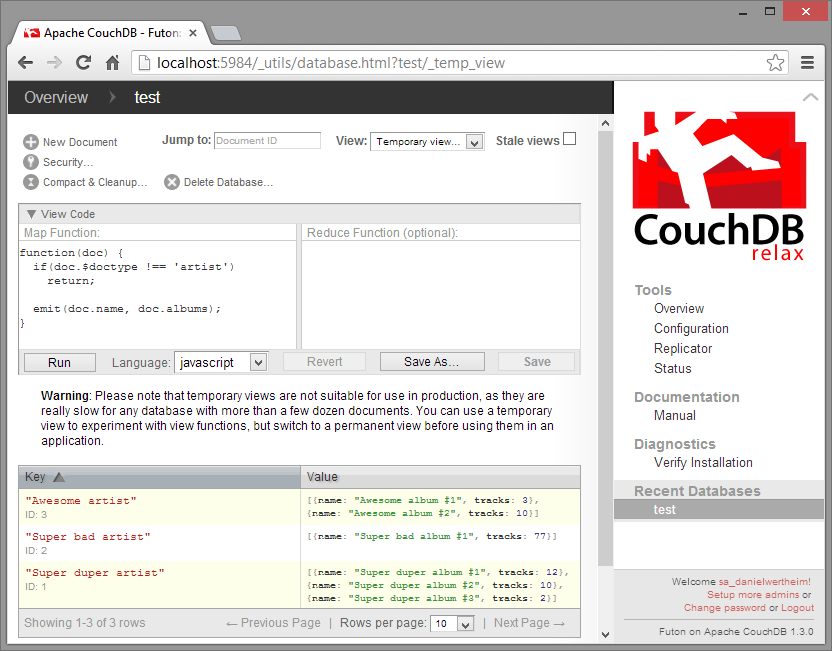
Lets have a look at creating a simple custom view that only will output the albums of an artist. You can do this using Futon. Open: http://localhost:5984/_utils/database.html?test/_temp_view and type in the following map function.
function(doc) {
  if(doc.$doctype !== 'artist')
    return;

  emit(doc.name, doc.albums);
}
If I chose to run the view, I get presented by the view result. Have in mind though that running a temporary view will traverse all your documents. Doing this is resource intensive, hence only suitable for development environments. For production use, you should store your views in a design document (a design document can hold many views).
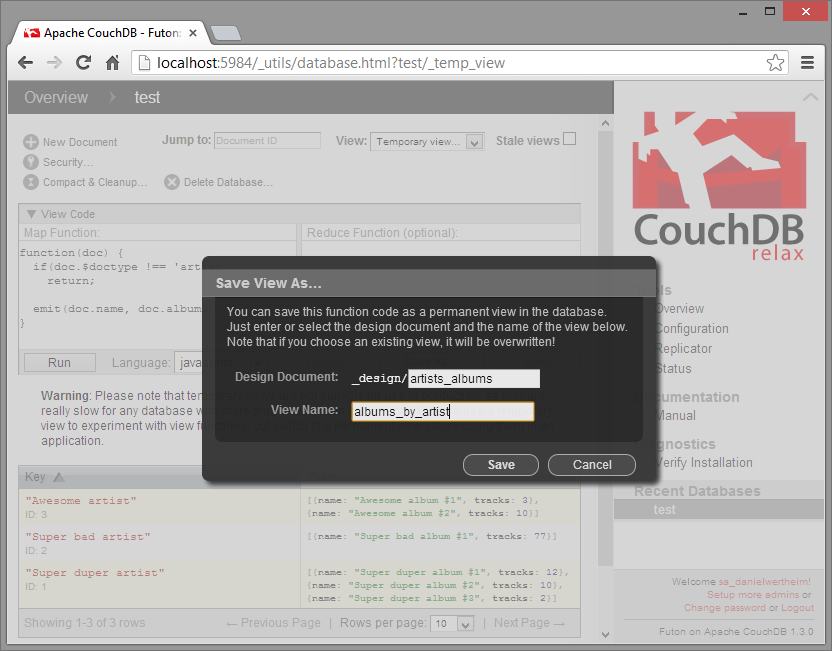
Lets say we are happy with this view and want to "publish" it by making it part of a design document. Then all we have to do is to press the Save As....
The view is now saved as part of the design document but yet not "materialized". The view will be materialized the first time it is queried. This goes for all the vies in the same document:
To change a view or multiple view just alter the design document they are stored in and save it as a new revision. This causes all the views in that design document to be rebuilt on the next access in case the view code has been changed – http://wiki.apache.org/couchdb/HTTPviewAPI
Some other readings in the subject of design documents and views:
- http://wiki.apache.org/couchdb/IntroductiontoCouchDB_views
- http://guide.couchdb.org/draft/design.html
- http://guide.couchdb.org/draft/views.html
Consume the view
Lets just query the view as it is, without limiting the result. Execute a GET against http://localhost:5984/test/_design/artists_albums/_view/albums_by_artist
{
    "total_rows": 3,
    "offset": 0,
    "rows": [
        {
            "id": "3",
            "key": "Awesome artist",
            "value": [
                {
                    "name": "Awesome album #1",
                    "tracks": 3
                },
                {
                    "name": "Awesome album #2",
                    "tracks": 10
                }
            ]
        },
        {
            "id": "2",
            "key": "Super bad artist",
            "value": [
                {
                    "name": "Super bad album #1",
                    "tracks": 77
                }
            ]
        },
        {
            "id": "1",
            "key": "Super duper artist",
            "value": [
                {
                    "name": "Super duper album #1",
                    "tracks": 12
                },
                {
                    "name": "Super duper album #2",
                    "tracks": 10
                },
                {
                    "name": "Super duper album #3",
                    "tracks": 2
                }
            ]
        }
    ]
}
CouchDb lets you "filter" your views in a variety of ways (http://wiki.apache.org/couchdb/HTTPviewAPI). Lets do a quick test. Lets just target one row. The row which has a key being "Super bad artist". Easy, just append key to the query string and provide an URL encoded value. Execute a GET against http://localhost:5984/test/_design/artists_albums/_view/albums_by_artist?key="Super bad artist"
{
    "total_rows": 3,
    "offset": 1,
    "rows": [
        {
            "id": "2",
            "key": "Super bad artist",
            "value": [
                {
                    "name": "Super bad album #1",
                    "tracks": 77
                }
            ]
        }
    ]
}
That was a brief tour on views. And even though we only scratched the surface of views and only used map functions, I hope it was enough for this introductory post, and let us now switch over to using the C# driver.
Introducing MyCouch
MyCouch is a simple async, open sourced, CoucDb client written in C#. It builds on top of the async HttpClient and lets you work with native JSON and/or entities/POCOs. With that said, remember, CouchDb uses HTTP as a protocol, hence if you find something missing or not acting as you want it, you could easily acomplish what you want using pure http-requests. MyCouch tries to keep the domain language of CouchDb and not hiding or abstracting away the fact that it is http based.
Install it
Lets have a quick look at how we would accomplish some of the steps we have done above. For simplicity I have just created a simple Console application using Visual Studio 2012 (there is a sample console app in the GitHub repository). MyCouch is distributed via NuGet. So to install it, open the Package Manager Console and invoke:
PM> Install-Package MyCouch
Now, lets start typing some code. The first task is to add yet another artist. What you use to communicate with CouchDb in MyCouch, is an implementation of MyCouch.IClient. There’s one, MyCouch.Client which accepts either a custom connection or a simple URL/Uri pointing to your database (read more).
static void Main(string[] args)
{
    using (var db = new MyCouch.Client("http://danielwertheim1:testtest1@localhost:5984/test"))
    {
        //Consume client here
    }
}
Since we have secured our database, I somehow need to pass the credentials. Here, I have chosen to do it using Basic http authentication (read more).
Documents
MyCouch lets you work with native JSON documents or entities/POCOs (read more) and you can either run it synchronously or asynchronously (read more). Lets start with inserting an artist using JSON. Inserting is done using a POST or PUT (according to docs, PUT is recommended).
var artistJson = "{"_id": "4",
                   "$doctype": "artist",
                   "name": "Fake artist 1",
                   "albums":[{"name": "Greatest fakes #1", "tracks": 3}]}";

var response = db.Documents.Post(artistJson);

//for async: db.Documents.PostAsync(artistJson);

Console.Write(response.GenerateToStringDebugVersion());
Every command in MyCouch will provide you with a response object in turn. The response will look a bit differently depending on what command you executed (read more).
RequestUri: http://localhost:5984/test/
RequestMethod: POST
Status: Created(201)
Error:<NULL>
Reason: <NULL>
Id: 4
Rev: 1-2cc0876b59cadf2e0271f03a7ea54c5c
To update the artist, lets say by adding a new album, you invoke a PUT:
var artistJson = "{"_id": "test:4",
                   "$doctype": "artist",
                   "name": "Fake artist 1",
                   "albums":[
                       {"name": "Greatest fakes #1", "tracks": 3},
                       {"name": "Greatest fakes #2", "tracks": 6}]}";

var response = db.Documents.Put("5", "1-2cc0876b59cadf2e0271f03a7ea54c5c", artistJson);

Console.Write(response.GenerateToStringDebugVersion());
The response:
RequestUri: http://localhost:5984/test/4?rev=1-2cc0876b59cadf2e0271f03a7ea54c5c
RequestMethod: PUT
Status: Created(201)
Error:<NULL>
Reason: <NULL>
Id: 4
Rev: 2-9d756cc83e3937f953648032ef8629bb
How about conflicts
Well, lets try it. Invoke the exact same PUT as we just did and lets inspect parts of the response:
Status: Conflict(409)
Error:conflict
Reason: Document update conflict.
Entities
Before looking at using views to query data, lets have a quick look at the Entity API. To insert a new artist like we did above, you would first need a model (read more about member names for _id and _rev etc).
public class Artist
{
    public string ArtistId { get; set; }
    public string ArtistRev { get; set; }

    public string Name { get; set; }
    public Album[] Albums { get; set; }
}

public class Album
{
    public string Name { get; set; }
    public int Tracks { get; set; }
}
Now, you could just use it to work with entities, e.g doing the same as we did with JSON previously.
var artist = new Artist
{
    ArtistId = "5",
    Name = "Foo bar",
    Albums = new[]
    {
        new Album { Name = "Hello world!", Tracks = 9 }
    }
};

var response = db.Entities.Post(artist);

Console.Write(response.GenerateToStringDebugVersion());
The response:
RequestUri: http://localhost:5984/test/
RequestMethod: POST
Status: Created(201)
Error:<NULL>
Reason: <NULL>
Id: 5
Rev: 1-725e193084247fcf7cc84e4cfa179746
IsEmpty: False
Model: Artist
In the JSON sample that we saw previously, we explicitly specified a meta field $doctype. When you work with entities, MyCouch will handle this for you, and it will be default use the name of the class as the value for $doctype. When working with entities, MyCouch will, on successful operation, extract e.g the _rev from the response and assign it to the entity, which also is returned via the response property: response.Entity.
Views
Apart from using MyCouch to perform simple and fast GET by id requests, you can also use it to query views (read more). There are different ways of doing this, but I will only show one way. But do not fear, it’s documented. But before querying the view, lets look at how we could create the view we previously created using Futon, but this time using MyCouch.
Creating a view
A view is, as previously stated, part of a design document which is a plain document; hence you can create one by just inserting a document. Lets have a look. First lets define it:
public static class Views
{
    public const string ArtistsAlbums =
        "{" +
            ""_id": "_design/artists_albums"," +
            ""language": "javascript"," +
            ""views": {" +
                ""albums_by_artist": {" +
                    ""map": "function(doc) {  if(doc.$doctype !== 'artist') return;  emit(doc.name, doc.albums);}"" +
                "}" +
            "}" +
        "}";
}
Now we could just use the client and POST or PUT it into the db:
db.Documents.Post(Views.ArtistsAlbums);
Remember, that you will get a conflict error if you didn’t delete the view we created before.
Query the view
Now that the view is in place, lets consume it. Views are accessed via the View API, hence using db.Views. Queries can be executed in two ways, via: RunQuery or Query. The difference in short:
Query<>()method will create a query and run the query for you using RunQuery. RunQuery lets you work freely with anyIViewQuery, so that you could run the same query against multiple databases.
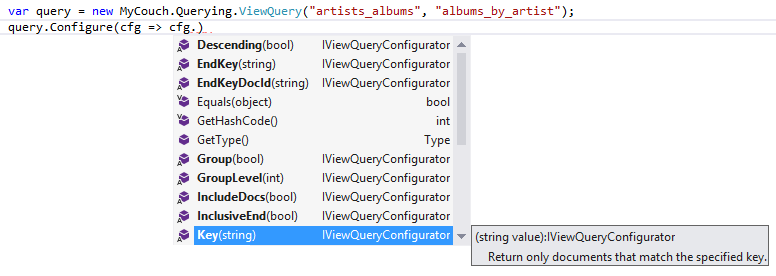
You can use a built in chained-configure API to configure your queries, or directly assign values to query.Options. I’ll use the former:
As you can see, there are a bunch of query capabilities and you can read about them in the documentation. I’ll go for a simple Key filter.
var query = new MyCouch.Querying.ViewQuery("artists_albums", "albums_by_artist");
query.Configure(cfg => cfg.Key("Fake artist 1"));

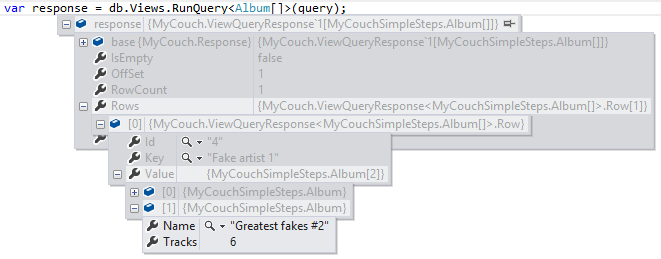
var response = db.Views.RunQuery<Album[]>(query);

Console.Write(response.GenerateToStringDebugVersion());
The response:
RequestUri: http://localhost:5984/test/_design/artists_albums/_view/albums_by_artist?key="Fake artist 1"
RequestMethod: GET
Status: OK(200)
Error:<NULL>
Reason: <NULL>
IsEmpty: False
TotalRows: 5
RowCount:1
Offset: 1
So you get some meta data that could be used for paging etc, but where are the albums? They are in the response.Rows.
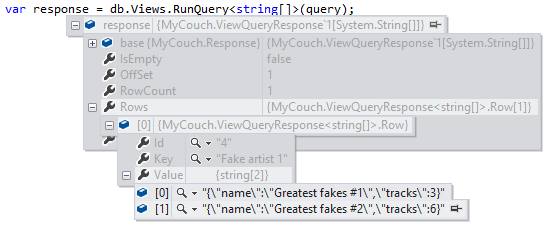
Of course you could get the result as JSON if you want:
Or as a JSON-array:
Summary
That’s it for now. I hope it wasn’t to overwhelming. I do realize I probably left you with a bunch of question but I hope you could find some of the answers in the project wiki. If not, just drop a comment here or ping me on Twitter: @danielwertheim or tweet with the hashtag #mycouch.
Cheers,
//Daniel

