
There are excellent resources around on how-to get started with Terraform, e.g. via Hashicorp Learn, which has contents for AWS, Azure etc. I do believe that a good solid foundation to start with should cover remote state and workspaces. Especially since they aren't that complex to get started with. Lets have a quick look of how that might look.
The goal of this guide is to have the Terraform state stored in Azure and to have two workspaces: "dev" and "prod"; configured and setup via Terraform. Each environment should contain one sample resource group were names and tags will be named dynamically based on the workspace, just so that you can see how it can be used to generate environment specific config.
Authentication, Terraform and Azure
In this guide, we will not configure any remote access keys, subscription-ids or similar in our Terraform config nor in any environment variables. So in order to enable Terraform to interact with Azure, we need to be authenticated.
Azure CLI
I'm using the Azure CLI for this. And I've ensured I'm logged in via az login, e.g:
$ az login
If you have multiple subscriptions configured, you can see them via az account list:
$ az account list
Output:
[
  {
    "cloudName": "AzureCloud",
    "id": "some guid",
    "isDefault": true,
    "name": "some name",
    "state": "Enabled",
    "tenantId": "some tenant id",
    "user": {
      "name": "Your username (e.g. mail)",
      "type": "user"
    }
  }
]
And you can set the active one via az account set:
$ az account set --subscription <name or id>
Remote state in Azure
Terraform need to keep access to state, describing your infrastructure, so that it can determine what changes your Terraform configuration would result in. This Terraform state can be kept locally and it can be stored remote: e.g in Hashicorp's hosted cloud; or in a cloud of your choice, e.g. Azure.
Another name for remote state in Terraform lingo is "backend". You can configure the backend in external files, in main.tf and via witches etc. In our case we will configure it almost in full via main.tf. Almost is in we will not provide any access key, subscription or similar in our main.tf file. By doing this and by using workspaces, we eliminate the need for a partial backend config via e.g. a separate backend-config.tf file used in terraform init with the -backend-config=<path> switch.
Configure the backend
In order to get started, ensure you have access to a storage container in Azure. For this guide, I will be using the following setup:
- Resource group:
tfstate(needs to be created manually) - Storage account:
tfstatedemo(needs to be created manually) - Container-name:
lab(needs to be created manually)
Lets add our first lines to main.tf:
# Define that the Azure provider should be used
# and lock down the version
provider "azurerm" {
  version = "=2.2.0"
  features {}
}

# Configure remote storage of our Terraform state in Azure
# No access keys, subscriptions or similar is needed here
terraform {
  backend "azurerm" {
    resource_group_name  = "tfstate"
    storage_account_name = "tfstatedemo"
    container_name       = "lab"
    key                  = "lab01"
  }
}
Workspaces
We will now setup our workspaces: "dev" and "prod". In order to do so, we need to initialize the Terraform environment.
Initialize the Terraform envorinment
We haven't configured any resources in main.tf yet, so there's no work to be performed by Terraform. But we can still initialize the environment. This is done via terraform init
$ terraform init
Output:
Initializing the backend...

Successfully configured the backend "azurerm"! Terraform will automatically
use this backend unless the backend configuration changes.

Initializing provider plugins...

Terraform has been successfully initialized!

You may now begin working with Terraform. Try running "terraform plan" to see
any changes that are required for your infrastructure. All Terraform commands
should now work.

If you ever set or change modules or backend configuration for Terraform,
rerun this command to reinitialize your working directory. If you forget, other
commands will detect it and remind you to do so if necessary.
At this point, nothing has been created in Azure.
Create the workspaces
A workspace is created using terraform workspace new <name>
$ terraform workspace new dev
Output:
Created and switched to workspace "dev"!

You're now on a new, empty workspace. Workspaces isolate their state,
so if you run "terraform plan" Terraform will not see any existing state
for this configuration.
Lets create one for "prod":
$ terraform workspace new prod
Output:
Created and switched to workspace "prod"!

You're now on a new, empty workspace. Workspaces isolate their state,
so if you run "terraform plan" Terraform will not see any existing state
for this configuration.
Change workspace
You can see information of what workspace you are in via terraform workspace show and terraform workspace list and you can change workspace using terraform workspace select
$ terraform workspace select dev
Output:
Switched to workspace "dev".
How are things in Azure right now?
If we have a look at our container in Azure, it now contains two keys:
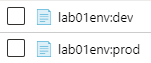
These were created by Terraform when we created the workspaces. Currently they are relatively empty though:
lab01env:dev
{
  "version": 4,
  "terraform_version": "0.12.23",
  "serial": 0,
  "lineage": "aac79178-2bc5-8aa9-aad4-aa35322e1fb9",
  "outputs": {},
  "resources": []
}
Create resources
Resources are created in a two step process. First you ask terraform to generate a plan, this is done via terraform plan. The plan contains the "planned" changes to be applied when used with terraform apply. I'll explicitly save the plan by giving it a name so that it can be passed to apply at a later state. But first, lets create something to plan and apply.
Define some variables
Before creating our resource group in Azure, we will define some variables with default values. Create a file named variables.tf and place it next to main.tf
variables.tf
variable "name" {
  default = "lab01"
}

variable "region" {
  default = "West Europe"
}

variable "tags" {
  default = {
    ctx = "labs"
  }
}
Use the Workspace name
You can access the current workspace name via terraform.workspace. We can use this information to generate dynamic resource names etc. In order to reuse those names, we create some locals in our main.tf. Append the following:
main.tf
# Extract variables and generates locals
# that depends on what workspace/env we are setting up
locals {
  name = "${var.name}${terraform.workspace}"
  tags = merge(var.tags, {"env" = terraform.workspace, "app" = local.name})
}
merge is a function in Terraform, that merges the contents of two maps. You can read about it here.
Now lets create our resource group that will be named differently depending on what workspace we are setting up. Append the following:
main.tf
resource "azurerm_resource_group" "rg" {
  name     = "${local.name}-rg"
  location = var.region
  tags     = local.tags
}
Plan dev workspace
In the dev workspace, run the following:
$ terraform plan -out=plan-dev
Output:
Refreshing Terraform state in-memory prior to plan...
The refreshed state will be used to calculate this plan, but will not be
persisted to local or remote state storage.


------------------------------------------------------------------------

An execution plan has been generated and is shown below.
Resource actions are indicated with the following symbols:
  + create

Terraform will perform the following actions:

  # azurerm_resource_group.rg will be created
  + resource "azurerm_resource_group" "rg" {
      + id       = (known after apply)
      + location = "westeurope"
      + name     = "lab01dev-rg"
      + tags     = {
          + "app" = "lab01dev"
          + "ctx" = "labs"
          + "env" = "dev"
        }
    }

Plan: 1 to add, 0 to change, 0 to destroy.

------------------------------------------------------------------------

This plan was saved to: plan-dev

To perform exactly these actions, run the following command to apply:
    terraform apply "plan-dev"
At this point. Nothing has happened in Azure. The + indicates that it will add the resource. Lets actually create the resource group.
Apply dev workspace
In the dev workspace, run the following:
$ terraform apply plan-dev
Output:
azurerm_resource_group.rg: Creating...
azurerm_resource_group.rg: Creation complete after 3s [id=/subscriptions/<subscription id>/resourceGroups/lab01dev-rg]

Apply complete! Resources: 1 added, 0 changed, 0 destroyed.
Plan prod workspace
At this point, nothing exists for the prod workspace. The state is tracked separately. And the workspaces are to be seen as siblings. To start working with the prod workspace, lets not for get to switch workspace and then plan and apply the plan.
$ terraform workspace select prod
$ terraform plan -out=plan-prod
Output:
Refreshing Terraform state in-memory prior to plan...
The refreshed state will be used to calculate this plan, but will not be
persisted to local or remote state storage.


------------------------------------------------------------------------

An execution plan has been generated and is shown below.
Resource actions are indicated with the following symbols:
  + create

Terraform will perform the following actions:

  # azurerm_resource_group.rg will be created
  + resource "azurerm_resource_group" "rg" {
      + id       = (known after apply)
      + location = "westeurope"
      + name     = "lab01prod-rg"
      + tags     = {
          + "app" = "lab01prod"
          + "ctx" = "labs"
          + "env" = "prod"
        }
    }

Plan: 1 to add, 0 to change, 0 to destroy.

------------------------------------------------------------------------

This plan was saved to: plan-prod

To perform exactly these actions, run the following command to apply:
    terraform apply "plan-prod"
As we can see, there will be a completely new resource group created.
$ terraform apply plan-prod
Output:
azurerm_resource_group.rg: Creating...
azurerm_resource_group.rg: Creation complete after 4s [id=/subscriptions/<subscription id>/resourceGroups/lab01prod-rg]
What has been done in Azure right now?
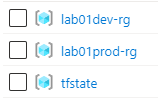
If we have a look at our resource groups in Azure, it now contains the Terraform state resource group and our recently two created resource groups:
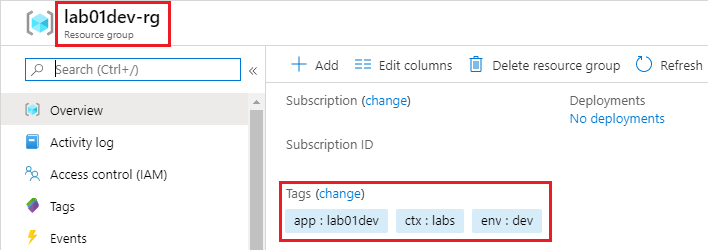
Looking at the lab01dev-rg resource group, it looks like this:
Workspaces can evolve separately
You can now evolve the workspaces separately. E.g. by adding new resources to main.tf and then try them out in the dev workspace before applying them to the prod workspace.
Default Workspace
If you run the command terraform workspace list you will see that there's actually three environments in our setup.
$ terraform workspace list
Output:
  default
* dev
  prod
So if you don't explicitly work with environments you are using one. The default. This can e.g. be used to represent your dev or your prod. You don't have to have both of those explicit. It's up to you. And yes, apart from the default workspace, the naming is arbitrary.
Different variables based on workspace?
Lets say you are creating an Azure Function app on the consumption plan and want to control the "Daily usage quota" (more info in previous blog post) and you want to have different values for the two workspaces: dev and prod. You could then define a variable with defaults in variables.tf like this:
variables.tf
variable "fun_a_daily_memory_time_quota" {
  default = {
    "dev" = 1000
    "prod" = 5000
  }
}
I extract all my workspace specific variables in locals in main.tf like this:
main.tf
locals {
  fun_a_daily_memory_time_quota  = var.fun_a_daily_memory_time_quota[terraform.workspace]
}
It can now be used throughout in your configuration via local.fun_a_daily_memory_time_quota.
Summary
We have taken a quick look at how workspaces can be setup and used to have multiple "environments" and have e.g a develop workspace evolve before those changes are applied to a production environment (or test, stage, UAT etc).
We have also looked at how you can use the name of the workspace to generate context based names and to select different configured values for specific variables.
As always. Feel free to give me hints and feedback of what can be improved etc. I love to learn.
Cheers,
//Daniel