The goal of this post is to give you some insight in how easy it is to get stuff done with Node.js (Node). It’s not going to be an incredible business application but it can still give business value. We will make use of Node and Handlebars to create a simple and custom report from issues stored in the public YouTrack repository for ReSharper.
GitHub repository
To make it easier for you to follow and to be able to see the final result, the code is up on GitHub. So the easiest thing for you to follow along, would be to pull it down:
git clone [email protected]:danielwertheim/nodejsreporter
Non Githubers
No need to panic. We will walk through everything and you will be able to create it all manually.
package.json – the Node app manifest
Now lets let the Node package manager (NPM) generate the manifest file “package.json” for us:
npm init
You will be presented some questions and you can go with the default values. You actually could keep it quite clean and remove most stuff in it. Like only keeping the name, description and version, but I also recommend dependencies. You can read more about it by typing:
npm help json
Or you can read about it in the online documenation. Since I have no intentions of publishing this “app” as a package using NPM, I’ve added "private": true. To keep this post a bit cleaner, I’ve also slimmed it down a bit:
{
    "name": "nodejsreporter",
    "version": "0.1.0",
    "description": "Simple sample of using Node.js and Handlebars to create a custom YouTrack report, using the YouTrack REST API.",
    "author": "Daniel Wertheim",
    "license": "MIT",
    "readmeFilename": "README.md",
    "private": true,
    "dependencies": {
        "handlebars": "~1.0.0"
    }
}
Note that I’ve defined a dependency on an external NPM-package, “handlebars”. With that in place, we can now let NPM download and install our dependencies and their’s dependencies:
npm install
Now, lets start coding.
app.js – The entry point for our app
Ensure there’s a file named "app.js" in the root folder of the application. Open it with your editor of choice. This is going to be the entry point for our app. First, lets import some modules we will create later in the post:
var config = require('./lib/config'),
    importer = require('./lib/jsonimporter.fake'),
    writer = require('./lib/reportwriter');
Now, lets first start importing the JSON and upon success, via a callback, generate the report using the reporter.
importer.import(function (json) {
    writer.write(json);
});
That was easy, now lets move further. But before writing the jsonimporter.fake and jsonimporter modules, lets get aquaintant with the YouTrack REST API.
YouTrack REST API
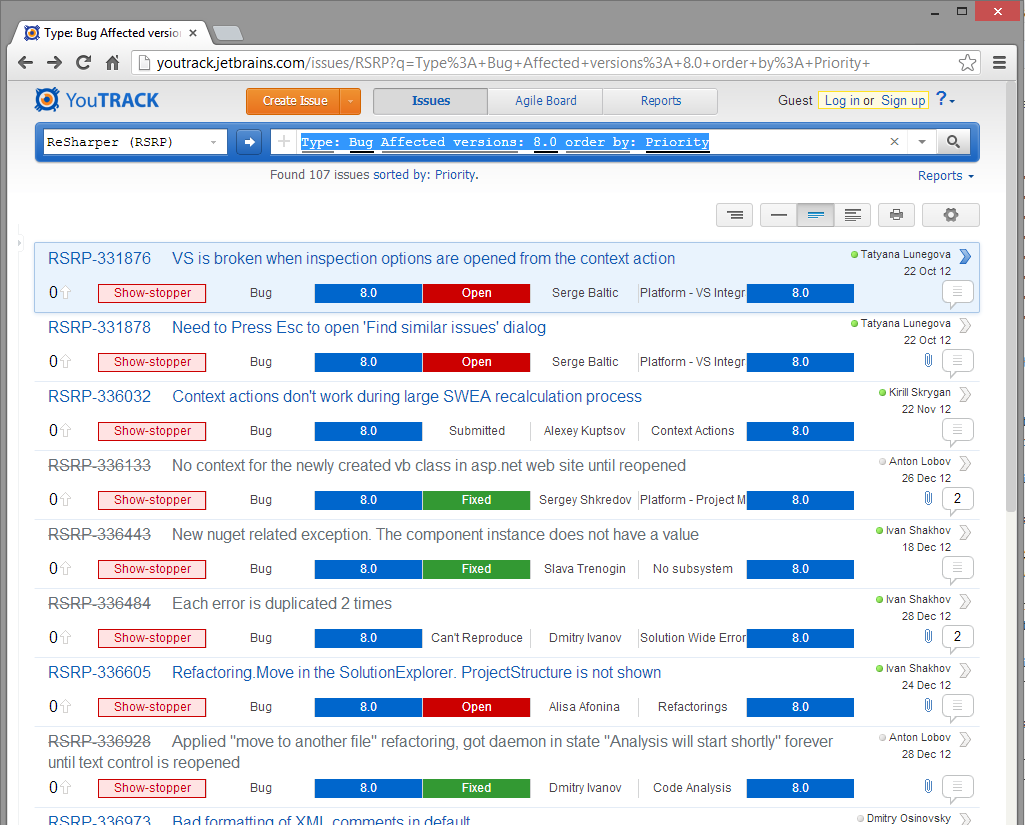
We will be interacting with this public available YouTrack repository, which is for JetBrains awesome lifesaving product ReSharper. Lets head over there and start building us a simple query that we will use in the REST call.
[
I’ve filtered on Bugs that affects version 8.0 and ordered the issues on Priority. Notice the URL. Extract the value for the querystring parameter "q":
Type%3A+Bug+Affected+versions%3A+8.0+order+by%3A+Priority+
Also note the project identifier for ReSharper is "RSRP". Lets try it out.
Enter Postman
Whenever I start to fiddle with a new HTTP based API, I turn to the Google Chrome extension “Postman”. If we have a look in the documentation for the YouTrack REST API, we find a member for getting issues by project:
GET /rest/issue/byproject/{project}?{filter}&{after}&{max}&{updatedAfter}
which for our example would be:
http://youtrack.jetbrains.com/rest/issue/byproject/RSRP?max=50&filter=Type%3A+Bug+Affected+versions%3A+8.0+order+by%3A+Priority+&with=id&with=summary&with=description&with=priority&with=state
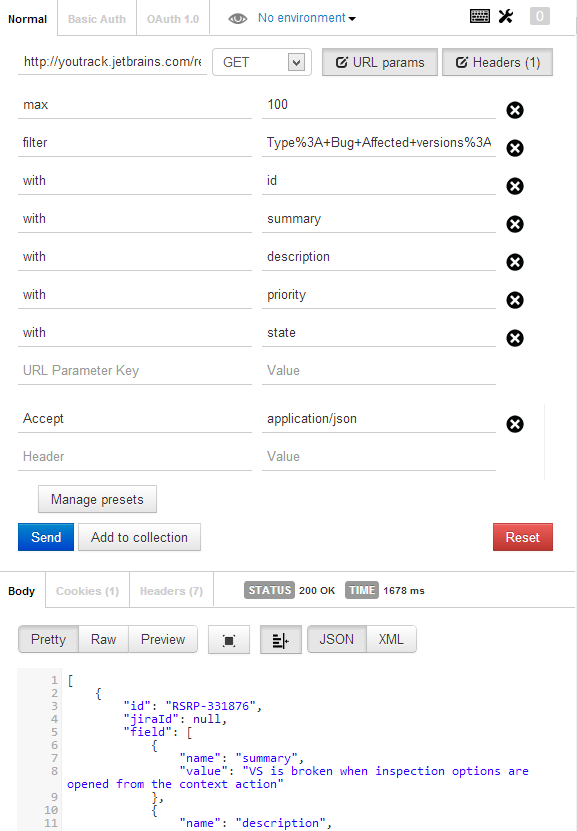
Notice that I’ve added a max=50 parameter in there. Now paste this into Postman. Add the accept HTTP header with the value application/json so that we get JSON returned instead of XML. Also, use with parameters via the querystring to limit the fields being returned in the resultset. It will look something like this:
[
To be a good citizen, lets save the returned JSON in a sample-data file, that we will use in a fake importer. Copy the JSON and put it in a file named "sampledata.json" and store it under the "resources" folder.
jsonimporter.fake.js – Consume sampledata.json
Lets create an JSON-importer that uses the sample data that we just stored. It’s going to be a really simple Node module that uses the system module "fs" just to read the contents and return it via the passed callback. We will do this using fs.readFile.
var config = require('./config.js'),
    fs = require('fs');

module.exports.import = function (onsuccess) {
    fs.readFile('resources/sampledata.json', 'utf8', function(err, json) {
        onsuccess(json);
    });
};
Exports (or module.exports) is a way to expose code from your module and making it accessible for consumers. It conforms to the CommonJs module specification.
config.js – Refactor time
Lets refactor out some settings that we will reuse. Create a new file "libconfig.js" and just make it export a simple object literal with some settings that we will use throughout or app. NOTE! When exporting a object literal, you need to use module.exports and not just exports.
module.exports = {
    encoding: 'utf8',
    paths: {
        resources: 'resources/',
        output: 'output/'
    }
};
Now lets use it in our previous module:
var config = require('./config.js'),
    fs = require('fs');

module.exports.import = function (onsuccess) {
    fs.readFile(config.paths.resources + 'sampledata.json', config.encoding, function(err, json) {
        onsuccess(json);
    });
};
Further improvements
I’ve really simplified the “config.js” module. You could make use of environment switches, __DIRNAME etc to make it more advanced and load different configurations depending on DEBUG, RELEASE etc. But that’s for you to improve this solution with.
reportwriter.js
This is going to be a bit more complicated, but still really simple, but lets start defining the shell of it:
var config = require('./config'),
    fs = require('fs'),
    handlebars = require('handlebars');

module.exports.write = function (json) {
    //Map JSON to Report object

    //Transform object to HTML report
};
Lets tackle the mapping of the JSON content to an object that we can work with.
Map JSON to Report object
To do this I’ll create two “classes”, Report and Issue. I’ll add some simple date time to the report, which later on will be used in the Handlebars transformation. Since some fields can be arrays, we handle this and pick the first item. Also, description can contain some markup, and with the help of a simple reg-ex, we will at least do something about their {code} blocks.
var Report = function (issues) {
    var now = new Date(),
        mappedIssues = [];

    for (var i = 0, l = issues.length; i < l; i++) {
        mappedIssues.push(new Issue(issues[i]));
    }

    return {
        createdISO: now.toISOString(),
        createdFriendly: now.toLocaleString(),
        issues: mappedIssues
    };
};

var Issue = function (src) {
    var issue = {
            id: src.id
        },
        codeBlockRegEx = new RegExp(/{code}([sS]*?){code}/gi);

    var mapFieldToIssue = function (field) {
        var name = field.name.toLowerCase().replace(' ', '');

        issue[name] = field.value;

        if (Array.isArray(field.value)) {
            issue[name] = field.value[0];
        }
    };

    for (var i = 0, l = src.field.length; i < l; i++) {
        mapFieldToIssue(src.field[i]);
    }

    if (issue.description) {
        issue.description = issue.description.replace(codeBlockRegEx, "$1");
    }

    return issue;
};
To put this to use, lets update our write function:
exports.write = function (json) {
    var report = new Report(JSON.parse(json));

    //Transform to HTML report
};
Now lets tackle the last part, where we transform the Report object to some HTML.
Transform to HTML report
Time to put Handlebars into action. We will define a really simple HTML template, which we will use with Handlerbars to “transform” our Report object to the end-user HTML-report. You can look at it as a sort of one-way binding.
I’ll not put any love into the design. That’s not for this post. The HTML-template is quite simple. Some HTML5 tags with some semantic class names.
<html lang="en">

    <meta charset="utf-8" />
    <title>Report {{createdFriendly}}</title>
    <link rel="stylesheet" href="report-styling.css" type="text/css" />


    <article class="report">
        <header>
            <h1>Sample report</h1>
            <time pubdate="{{createdISO}}" class="report-publishdate">{{createdFriendly}}</time>
        </header>
        {{#each issues}}
        <article class="issue">
            <header>
                <h2>
                    <span class="issue-id">{{id}}</span>
                    <span class="issue-summary">{{summary}}</span>
                </h2>
            </header>
            <pre class="issue-description">{{description}}</pre>
            <footer>
                <ul>
                    <li class="issue-priority">{{priority}}</li>
                    <li class="issue-state">{{state}}</li>
                </ul>
            </footer>
        </article>
        {{/each}}
        <footer>
            <time pubdate="{{createdISO}}" class="report-publishdate">{{createdFriendly}}</time>
        </footer>
    </article>
Lets make the final changes to our reportwriter module:
Finalizing reportwriter.js
Lets put in the last changes to our simple reportwriter.
module.exports.write = function (json) {
    var report = new Report(JSON.parse(json));

    transformReport(report, writeFiles);
};
The idea is to let a function transformReport be responsible for transforming the Report object to HTML and then, upon success, via a callback invoke a function writefiles that will write the generated report and a CSS file to the output folder.
var writeFiles = function (html) {
    fs.writeFile(config.paths.output + 'report.html', html, config.encoding);
    fs.createReadStream(config.paths.resources + 'report-styling.css')
        .pipe(fs.createWriteStream(config.paths.output + 'report-styling.css'));
};

var transformReport = function (report, onsuccess) {
    fs.readFile(config.paths.resources + 'report-template.html', config.encoding, function (err, htmlTemplate) {
        var template = handlebars.compile(htmlTemplate),
            html = template(report);

        onsuccess(html);
    });
};
You should now be able to generate a report from the code, but it will be tied to the jsonimporter.fake which makes use of the sampledata.json file. Lets fix that.
jsonimporter
This is the last piece we will have a look at. We are now going to import “live” data from YouTrack. Lets create a new module: jsonimporter.js
var config = require('./config.js'),
    http = require('http');

module.exports.import = function (onsuccess) {
    http.get(config.jsonimporter.src, function(res) {
        var json = '';

        if (res.statusCode === 200) {
            res.setEncoding(config.encoding);

            res.on('data', function (chunk) {
                json += chunk;
            });

            res.on('end', function() {
                onsuccess(json);
            });
        }
    }).on('error', function (err) {
        console.log('Error: ' + err);
    });
};
It will perform a simple HTTP GET like we did with Postman, and upon success return the JSON via a onsuccess callback. The actual request is defined in our config module, which now looks like this:
module.exports = {
    encoding: 'utf8',
    paths: {
        resources: 'resources/',
        output: 'output/'
    },
    jsonimporter: {
        src: {
            hostname: 'youtrack.jetbrains.com',
            port: 80,
            path: '/rest/issue/byproject/RSRP?max=50&filter=Type%3A+Bug+Affected+versions%3A+8.0+order+by%3A+Priority+&with=id&with=summary&with=description&with=priority&with=state',
            headers: {
                accept: 'application/json'
            }
        }
    }
};
To put this real importer into use, we need to update our app.js. Just import the new jsonimporter instead of the jsonimporter.fake:
importer = require('./lib/jsonimporter.fake')
becomes
importer = require('./lib/jsonimporter')
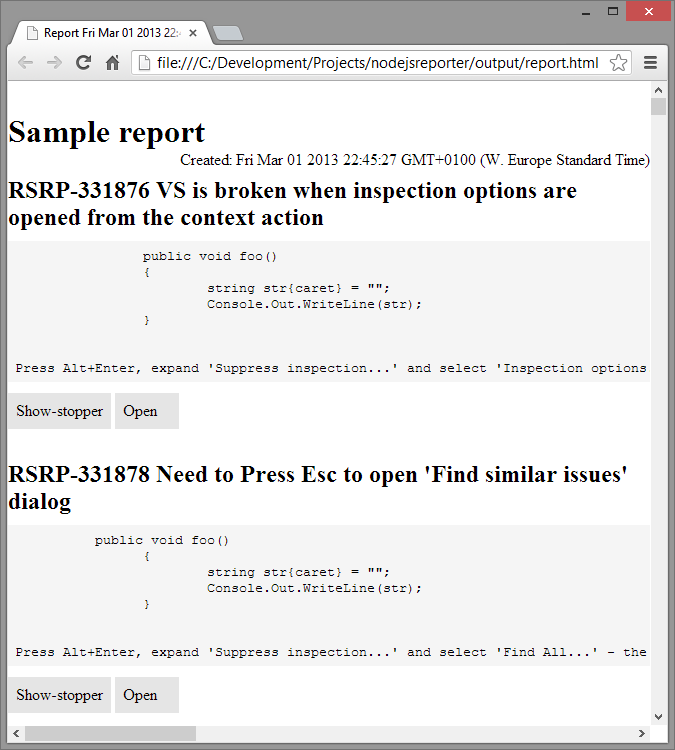
That’s it. I hope you have seen the simplicity of Node. Check out the code in the GitHub repository and fiddle arround with it. The simple report now looks something like this:
Have fun,
//Daniel

